Skip to content

Installing the Simulation Execution Manager for ns-3

Traditionally, in earlier days, a batch of ns-2 simulations were run using suitable scripting languages and the trace analysis was also done using scripts written in different scripting languages such as Perl. The following article [4] presented the classical way of doing ns-3 batch simulations and analysis.

Generating Genuine, Quality Tables & Graphs for Publication.

SEM allows us to do the batch simulation and analysis in a more sophisticated way.

SEM(Simulation Execution Manager)
is a Python library designed to help manage and streamline the execution of multiple ns-3 simulations, handle the results, and organize them in a manner conducive to further analysis. This tool is particularly useful when running extensive simulations with ns-3, where you need to automate processes, manage multiple runs, and collect outputs for post-processing. This article explains what is SEM and how to install it under Linux.

Overview of SEM

SEM is aimed at simplifying the workflow for simulations done in ns-3, a popular discrete-event network simulator. Typically, running simulations in ns-3 involves manually writing scripts, executing them individually, and parsing results. For large-scale simulations or repetitive runs with varying parameters, this manual process can become cumbersome.

SEM automates this process, allowing users to:

  1. Run Multiple Simulations: Execute several ns-3 scripts sequentially or in parallel, with different parameters and configurations. It abstracts away the complexity of manually running the scripts and managing batch runs.
  2. Manage Results: After execution, SEM collects the results from each run, processes the data, and organizes it into structures like Pandas DataFrames. This makes it easier for users to analyze and visualize the outcomes.
  3. Parameterization: Users can vary simulation parameters across different runs, enabling easy execution of parameter sweeps and sensitivity analyses.

Features of SEM

According to [1], the following are the key features of SEM:

  • Interactive Command Line Interface
  • Python API
  • Automatic optimization of parallel execution of simulations
  • Supports DRMAA clusters
  • Can export results to MATLAB .mat, Numpy .npy and directory tree formats
  • Supports for git-based tracking
  • Skips simulations that are already available in the database

SEM Feature Highlights

  1. Automation of Simulation Runs:
    • SEM allows you to automate the entire process of running simulations. You can define the number of simulation runs, specify different parameters, and the tool will take care of executing these runs without manual intervention.
  2. Result Collection:
    • After each simulation run, SEM collects the results, typically saved in output files, and structures them in a format that is easy to process, such as CSV files, JSON, or directly into Python data structures like lists or DataFrames.
  3. Parallel Execution:
    • The tool supports running simulations in parallel, making use of multicore processors to reduce the overall execution time. This is particularly beneficial when running multiple simulations with different configurations.
  4. Parameter Management:
    • You can define a range of parameters and systematically run simulations across these parameter sets. SEM handles the complexity of executing these parameterized scripts and tracking the different settings.
  5. Post-Processing:
    • Once the simulations are completed, SEM provides mechanisms to organize the output data. This allows for seamless integration with Python libraries such as Matplotlib, NumPy, and Pandas for analysis and visualization.
  6. Binder Integration:
    • SEM can be integrated with Jupyter notebooks via Binder, allowing users to run simulations directly from a web-based interface without the need for complex local setups. This is particularly useful for sharing and collaborating on simulation experiments.

Advantages of using SEM

  • Parameter Sweeps: You can conduct parameter sweeps for network configurations, such as varying transmission power, bandwidth, or node density in a LoRaWAN simulation. SEM handles the automation of running the simulations across different configurations and organizing the results for analysis.
  • Monte Carlo Simulations: SEM can help run multiple iterations of stochastic network simulations, such as those that depend on random processes (e.g., random mobility models or packet arrival processes). After collecting the data from each run, the tool simplifies statistical analysis.
  • Sensitivity Analysis: By running simulations with slightly varying parameters, SEM can help assess the robustness of network protocols and configurations against environmental and operational changes.
  • Batch Processing for Educational Purposes: SEM can be used in an academic setting to help students and researchers manage and execute a large number of simulation runs, without requiring deep familiarity with ns-3’s scripting and execution details.

Using SEM

  1. Setup: You start by writing your simulation scripts in ns-3. SEM is not a replacement for ns-3 scripting but rather an automation layer over it.
  2. Execution: Using the Python library, you define how many runs you want to execute, which scripts to use, and what parameters to vary. SEM will handle the execution and keep track of which run corresponds to which set of parameters.
  3. Data Collection: SEM collects the output from each run and aggregates it into user-friendly formats, allowing you to quickly transition to analysis and visualization.
  4. Post-Processing and Analysis: After the simulations are completed and the data is collected, you can use Python libraries like Pandas for data manipulation or Matplotlib for visualizing the results.

Installation of SEM

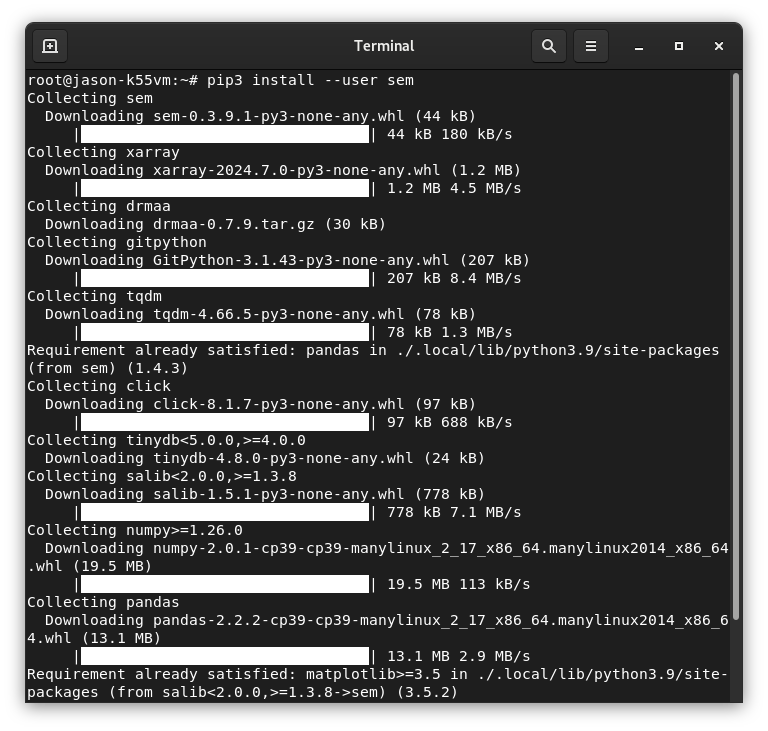
As mentioned in [3], we can easily install SEM using pip as follows:

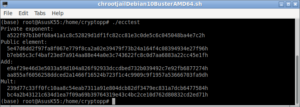
$ pip3 install --user sem

This command will install all the dependencies required for running sem. This will install the sem package and its dependencies in the system’s Python library path. The following screenshot shows the progress of the installation process.

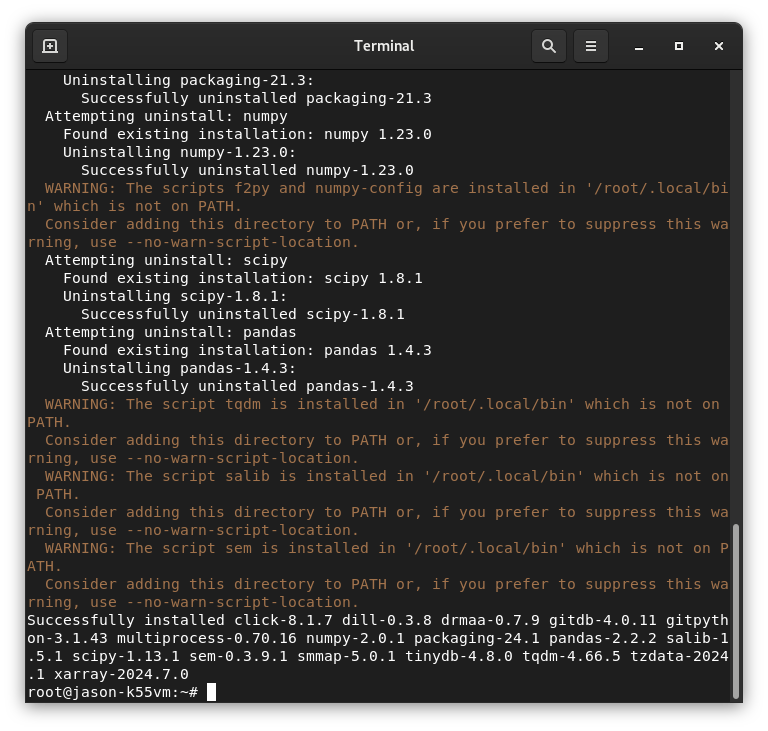
The following screenshot shows the successful installation :

Alternatively, we can install the latest development version, directly from the latest commit on the master branch of the Github repository:

pip3 install --user -U https://github.com/signetlabdei/sem/archive/master.zip

Hidden Section! Contact Charles  

The key/passphrase will be given once you have been approved for getting paid research support/assistance from Charles. To get paid support, you may start a 'free' research discussion.  

WhatsApp chatDiscuss Through WhatsApp


Testing SEM

After successful installation, one can follow [5] to start with SEM based ns-3 batch simulation and analysis.

We can test the working of our installation of SEM with a few lines of Python code:

import sem
ns_path = 'ns-3-dev/'
script = 'wifi-multi-tos'
campaign_dir = 'testResults'
campaign = sem.CampaignManager.new(ns_path, script, campaign_dir, overwrite=True, max_parallel_processes=2)

If we run the above command then it will start building ns-3 (if ns-3 is newly installed, then it will compile everything – so, it may take lot of time)

Building ns-3: 100%|████████████████████████████| 2/2 [00:00<00:00, 15.16file/s]

Display the campaign

print(campaign)
--- Campaign info ---
script: wifi-multi-tos
params: {'nWifi': 4.0, 'distance': 1.0, 'simulationTime': '+10s', 'useRts': False, 'mcs': 7.0, 'channelWidth': 20.0, 'useShortGuardInterval': False}
HEAD: 
Runner type: 
-----------

Now set some parameters :

param_combination = {
'nWifi': 1,
'distance': 1,
'simulationTime': 10,
'useRts': False,
'mcs': 7,
'channelWidth': 20,
'useShortGuardInterval': False,
'RngRun': 0
}

And run the campaign again :

retults=campaign.run_simulations([param_combination])

may build and run the simulation again:

Building ns-3: 100%|████████████████████████████| 2/2 [00:00<00:00, 14.28file/s]
Running simulations: 100%|████████████████| 1/1 [00:00<00:00,  1.41simulation/s]

Display the a sample result from the campaign:

example_result = campaign.db.get_complete_results()[0]
print(example_result)

This may show a result like this :

{'params': {'nWifi': 1, 'distance': 1, 'simulationTime': 10, 'useRts': False, 
'mcs': 7, 'channelWidth': 20, 'useShortGuardInterval': False, 'RngRun': 0}, 
'meta': {'id': 'bd00321f-4836-4a07-b658-fe5e3bbbad48', 'elapsed_time': 6.03503942489624, 
'exitcode': 0}, 'output': {'stdout': 'Aggregated throughput: 46.9038 Mbit/s\n', 'stderr': ''}}

We may plot different graphs using the stored results. We may see the way of generating grphs and doing trace analysis in another article.


Summary

SEM streamlines the management of ns-3 simulations by automating repetitive tasks, organizing simulation results, and providing tools for post-processing and analysis. Its integration with Python and Jupyter notebooks makes it highly versatile, especially for users who want to quickly conduct large-scale simulations and analyze the outcomes in an efficient and scalable way.

By reducing the overhead associated with running multiple ns-3 simulations, SEM allows researchers and developers to focus more on the insights generated from their simulations rather than the logistics of executing them.

References:

  1. https://apps.nsnam.org/app/sem/
  2. https://github.com/signetlabdei/sem
  3. https://signetlabdei.github.io/sem/installation.html#via-pip
  4. https://www.projectguideline.com/generating-genuine-quality-tables-graphs-for-publication/
  5. https://signetlabdei.github.io/sem/getting-started.html#running-simulations
WhatsApp Discuss Through WhatsApp